実稼働環境におけるベスト・プラクティス: パフォーマンスと信頼性
この記事では、実稼働環境にデプロイされた Express アプリケーションのパフォーマンスと信頼性に関するベスト・プラクティスについて説明します。
This topic clearly falls into the “devops” world, spanning both traditional development and operations. Accordingly, the information is divided into two parts:
- コードで実行する処理 (開発部分)
- 環境/セットアップで実行する処理 (運用部分)
コードで実行する処理
以下に、アプリケーションのパフォーマンスを向上させるためにコードで実行できる処理をいくつか挙げます。
gzip 圧縮を使用する
Gzip compressing can greatly decrease the size of the response body and hence increase the speed of a web app. Gzip 圧縮により、応答本体のサイズを大幅に縮小できるため、Web アプリケーションの速度が高くなります。Express アプリケーションで gzip 圧縮として compression ミドルウェアを使用してください。次に例を示します。 For example:
const compression = require('compression')
const express = require('express')
const app = express()

app.use(compression())
For a high-traffic website in production, the best way to put compression in place is to implement it at a reverse proxy level (see Use a reverse proxy). In that case, you do not need to use compression middleware. トラフィックが多い実稼働環境の Web サイトでは、圧縮を適用する最適な方法は、リバース・プロキシー・レベルで実装することです (リバース・プロキシーの使用を参照)。その場合は、compression ミドルウェアを使用する必要はありません。Nginx で gzip 圧縮を有効にする方法について詳しくは、Nginx 資料の Module ngx_http_gzip_module を参照してください。
同期関数を使用しない
同期の関数とメソッドは、返されるまで実行中のプロセスを結合します。同期関数に対する 1 回の呼び出しは数マイクロ秒から数ミリ秒で返される可能性がありますが、トラフィックが多い Web サイトでは、これらの呼び出しを合計すると、アプリケーションのパフォーマンスが低下します。実稼働環境では、これらを使用しないでください。 A single call to a synchronous function might return in a few microseconds or milliseconds, however in high-traffic websites, these calls add up and reduce the performance of the app. Avoid their use in production.
ノードおよび多くのモジュールは、同期版と非同期版の関数を提供していますが、実稼働環境では必ず非同期版を使用してください。同期関数を使用しても構わないのは、初期始動時のみです。 The only time when a synchronous function can be justified is upon initial startup.
You can use the --trace-sync-io command-line flag to print a warning and a stack trace whenever your application uses a synchronous API. Of course, you wouldn’t want to use this in production, but rather to ensure that your code is ready for production. See the node command-line options documentation for more information.
ロギングを正確に実行する
In general, there are two reasons for logging from your app: For debugging and for logging app activity (essentially, everything else). Using console.log() or console.error() to print log messages to the terminal is common practice in development. But these functions are synchronous when the destination is a terminal or a file, so they are not suitable for production, unless you pipe the output to another program.
For debugging
デバッグの目的でロギングを実行する場合は、console.log() を使用するのではなく、debug などの特殊なデバッグ・モジュールを使用します。このモジュールでは、DEBUG 環境変数を使用して、console.err() に送信されるデバッグ・メッセージを制御できます。アプリケーションを純粋に非同期的にしておくために、console.err() を別のプログラムにパイプ接続することもできます。しかし、実稼働環境ではデバッグを実行することはお勧めしません。 This module enables you to use the DEBUG environment variable to control what debug messages are sent to console.error(), if any. To keep your app purely asynchronous, you’d still want to pipe console.error() to another program. But then, you’re not really going to debug in production, are you?
アプリケーション・アクティビティー
If you’re logging app activity (for example, tracking traffic or API calls), instead of using console.log(), use a logging library like Pino, which is the fastest and most efficient option available.
例外を適切に処理する
Node apps crash when they encounter an uncaught exception. Not handling exceptions and taking appropriate actions will make your Express app crash and go offline. アプリケーションが確実に自動再始動するようにする Fortunately, Express apps typically have a short startup time. Nevertheless, you want to avoid crashing in the first place, and to do that, you need to handle exceptions properly.
確実にすべての例外を処理するには、以下の技法を使用します。
Before diving into these topics, you should have a basic understanding of Node/Express error handling: using error-first callbacks, and propagating errors in middleware. 上記のトピックを読む前に、error-first コールバックの使用と、ミドルウェアへのエラーの伝搬という Node/Express エラー処理の基礎を理解しておく必要があります。Node は、非同期関数からエラーを返すために「error-first コールバック」という規則を使用します。この場合、コールバック関数への最初のパラメーターがエラー・オブジェクトで、その後に続くパラメーターに結果データがあります。エラーがないことを示すには、最初のパラメーターとして null を渡します。コールバック関数は、エラーを有意に処理するには、error-first コールバック規則に対応して従う必要があります。Express におけるベスト・プラクティスは、next() 関数を使用して、ミドルウェア・チェーンを介してエラーを伝搬することです。 To indicate no error, pass null as the first parameter. The callback function must correspondingly follow the error-first callback convention to meaningfully handle the error. And in Express, the best practice is to use the next() function to propagate errors through the middleware chain.
エラー処理のその他の基礎については、下記を参照してください。
Try-catch の使用
Try-catch は、同期コードで例外をキャッチするために使用できる JavaScript 言語構造体です。Try-catch は、例えば、下記のように JSON 構文解析エラーを処理するために使用します。 Use try-catch, for example, to handle JSON parsing errors as shown below.
Here is an example of using try-catch to handle a potential process-crashing exception. This middleware function accepts a query field parameter named “params” that is a JSON object.
app.get('/search', (req, res) => {
  // Simulating async operation
  setImmediate(() => {
    const jsonStr = req.query.params
    try {
      const jsonObj = JSON.parse(jsonStr)
      res.send('Success')
    } catch (e) {
      res.status(400).send('Invalid JSON string')
    }
  })
})
However, try-catch works only for synchronous code. ただし、Try-catch は同期コードでのみ機能します。Node プラットフォームは主に (特に実稼働環境で) 非同期的であるため、Try-catch は多くの例外をキャッチしません。
Promise の使用
When an error is thrown in an async function or a rejected promise is awaited inside an async function, those errors will be passed to the error handler as if calling next(err)
app.get('/', async (req, res, next) => {
  const data = await userData() // If this promise fails, it will automatically call `next(err)` to handle the error.

  res.send(data)
})

app.use((err, req, res, next) => {
  res.status(err.status ?? 500).send({ error: err.message })
})
Also, you can use asynchronous functions for your middleware, and the router will handle errors if the promise fails, for example:
app.use(async (req, res, next) => {
  req.locals.user = await getUser(req)

  next() // This will be called if the promise does not throw an error.
})
Best practice is to handle errors as close to the site as possible. So while this is now handled in the router, it’s best to catch the error in the middleware and handle it without relying on separate error-handling middleware.
実行してはならないこと
One thing you should not do is to listen for the uncaughtException event, emitted when an exception bubbles all the way back to the event loop. Adding an event listener for uncaughtException will change the default behavior of the process that is encountering an exception; the process will continue to run despite the exception. This might sound like a good way of preventing your app from crashing, but continuing to run the app after an uncaught exception is a dangerous practice and is not recommended, because the state of the process becomes unreliable and unpredictable.
さらに、uncaughtException の使用は、正式に粗雑なものとして認められており、これをコアから削除するための提案が出されています。したがって、uncaughtException を listen するのは悪い方法です。この理由から複数のプロセスとスーパーバイザーなどの使用をお勧めしています。異常終了と再始動は、場合によってはエラーから復旧するための最も信頼できる方法となります。 So listening for uncaughtException is just a bad idea. This is why we recommend things like multiple processes and supervisors: crashing and restarting is often the most reliable way to recover from an error.
また、domain の使用もお勧めしません。このモジュールは概して問題を解決しないため、推奨されていません。 It generally doesn’t solve the problem and is a deprecated module.
Things to do in your environment / setup
{#in-environment}
以下に、アプリケーションのパフォーマンスを向上させるためにシステム環境で実行できる処理をいくつか挙げます。
- Set NODE_ENV to “production”
- Ensure your app automatically restarts
- Run your app in a cluster
- Cache request results
- Use a load balancer
- Use a reverse proxy
NODE_ENV を「production」に設定する
NODE_ENV 環境変数は、アプリケーションが実行される環境 (通常は開発または実稼働) を指定します。パフォーマンスを向上させるために実行できる最も単純な処理の 1 つは、NODE_ENV を「production」に設定することです。 One of the simplest things you can do to improve performance is to set NODE_ENV to production.
NODE_ENV を「production」に設定すると、Express は次のようになります。
- ビュー・テンプレートをキャッシュに入れる。
- CSS 拡張から生成された CSS ファイルをキャッシュに入れる。
- 詳細度の低いエラー・メッセージを生成する。
Tests indicate that just doing this can improve app performance by a factor of three!
環境固有のコードを作成する必要がある場合は、process.env.NODE_ENV を使用して NODE_ENV の値を確認できます。どの環境変数の値を確認する場合でもパフォーマンスに悪影響が及ぶため、慎重に行ってください。 Be aware that checking the value of any environment variable incurs a performance penalty, and so should be done sparingly.
開発環境では、通常、対話式シェルで環境変数を設定します。例えば、export または .bash_profile ファイルを使用します。しかし、一般的には実動サーバーではそうしません。代わりに、OS の init システム (systemd または Upstart) を使用します。次のセクションでは、init システムの一般的な使用法について詳しく説明しています。ここで重点的に説明したのは、NODE_ENV の設定がパフォーマンスにとって極めて重要であるため (かつ簡単に実行できるため) です。 But in general, you shouldn’t do that on a production server; instead, use your OS’s init system (systemd). The next section provides more details about using your init system in general, but setting NODE_ENV is so important for performance (and easy to do), that it’s highlighted here.
systemd では、unit ファイルで Environment ディレクティブを使用します。次に例を示します。 For example:
# /etc/systemd/system/myservice.service
Environment=NODE_ENV=production
For more information, see Using Environment Variables In systemd Units.
アプリケーションが確実に自動再始動するようにする
In production, you don’t want your application to be offline, ever. This means you need to make sure it restarts both if the app crashes and if the server itself crashes. Although you hope that neither of those events occurs, realistically you must account for both eventualities by:
- アプリケーション (および Node) が異常終了した場合にプロセス・マネージャーを使用してそれらを再始動する。
- Using the init system provided by your OS to restart the process manager when the OS crashes. It’s also possible to use the init system without a process manager.
Node applications crash if they encounter an uncaught exception. The foremost thing you need to do is to ensure your app is well-tested and handles all exceptions (see handle exceptions properly for details). But as a fail-safe, put a mechanism in place to ensure that if and when your app crashes, it will automatically restart.
プロセス・マネージャーを使用する
開発環境では、単にコマンド・ラインから node server.js などを使用してアプリケーションを開始しています。ただし、この方法を実稼働環境で実行すると、危険を招くことになります。アプリケーションが異常終了した場合、アプリケーションは再始動されるまでオフラインになります。アプリケーションが異常終了した場合に確実に再始動するようにするには、プロセス・マネージャーを使用します。プロセス・マネージャーは、デプロイメントを容易に行えるようにして、高可用性を実現し、アプリケーションを実行時に管理できるようにする、アプリケーションの「コンテナー」です。 But doing this in production is a recipe for disaster. If the app crashes, it will be offline until you restart it. To ensure your app restarts if it crashes, use a process manager. A process manager is a “container” for applications that facilitates deployment, provides high availability, and enables you to manage the application at runtime.
アプリケーションを異常終了時に再始動することに加えて、プロセス・マネージャーでは以下が可能になります。
- ランタイム・パフォーマンスとリソース使用量に関するインサイトを得る。
- パフォーマンスを向上させるために設定を動的に変更する。
- Control clustering (pm2).
Historically, it was popular to use a Node.js process manager like PM2. See their documentation if you wish to do this. However, we recommend using your init system for process management.
init システムの使用
The next layer of reliability is to ensure that your app restarts when the server restarts. Systems can still go down for a variety of reasons. To ensure that your app restarts if the server crashes, use the init system built into your OS. The main init system in use today is systemd.
Express アプリケーションで init システムを使用する方法は 2 つあります。
- Run your app in a process manager, and install the process manager as a service with the init system. The process manager will restart your app when the app crashes, and the init system will restart the process manager when the OS restarts. This is the recommended approach.
- init システムで直接、アプリケーション (および Node) を実行します。この方法の方が単純ですが、プロセス・マネージャーを使用する場合に得られる利点は得られません。 This is somewhat simpler, but you don’t get the additional advantages of using a process manager.
Systemd
Systemd は、Linux システムとサービス・マネージャーです。大半の主要な Linux ディストリビューションでは、Systemd がデフォルトの init システムとして採用されています。 Most major Linux distributions have adopted systemd as their default init system.
Systemd サービス構成ファイルは、unit ファイル という名前で、ファイル名の末尾は .service です。次に、Node アプリケーションを直接管理するための unit ファイルの例を示します (太字のテキストを、ご使用のシステムとアプリケーションの値に置き換えてください)。 Here’s an example unit file to manage a Node app directly. Replace the values enclosed in <angle brackets> for your system and app:
[Unit]
Description=<Awesome Express App>

[Service]
Type=simple
ExecStart=/usr/local/bin/node </projects/myapp/index.js>
WorkingDirectory=</projects/myapp>

User=nobody
Group=nogroup

# Environment variables:
Environment=NODE_ENV=production

# Allow many incoming connections
LimitNOFILE=infinity

# Allow core dumps for debugging
LimitCORE=infinity

StandardInput=null
StandardOutput=syslog
StandardError=syslog
Restart=always

[Install]
WantedBy=multi-user.target
Systemd について詳しくは、systemd の解説 (man ページ) を参照してください。
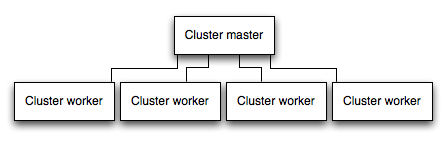
アプリケーションをクラスターで実行する
マルチコア・システムでは、プロセスのクラスターを起動することで、Node アプリケーションのパフォーマンスを数倍も向上させることができます。クラスターは、アプリケーションの複数インスタンスを実行して (理想的には CPU コアごとに 1 つのインスタンス)、負荷とタスクをインスタンス間で分散させます。 A cluster runs multiple instances of the app, ideally one instance on each CPU core, thereby distributing the load and tasks among the instances.
IMPORTANT: Since the app instances run as separate processes, they do not share the same memory space. That is, objects are local to each instance of the app. Therefore, you cannot maintain state in the application code. However, you can use an in-memory datastore like Redis to store session-related data and state. This caveat applies to essentially all forms of horizontal scaling, whether clustering with multiple processes or multiple physical servers.
In clustered apps, worker processes can crash individually without affecting the rest of the processes. Apart from performance advantages, failure isolation is another reason to run a cluster of app processes. クラスター・アプリケーションでは、ワーカー・プロセスは、残りのプロセスに影響を与えることなく、個々に異常終了することがあります。パフォーマンス上の利点の他に障害分離は、アプリケーション・プロセスのクラスターを実行するもう 1 つの理由です。ワーカー・プロセスが異常終了するたびに、必ず、イベントをログに記録して、cluster.fork() を使用して新規プロセスを作成してください。
Node のクラスター・モジュールの使用
Clustering is made possible with Node’s cluster module. This enables a master process to spawn worker processes and distribute incoming connections among the workers.
PM2 の使用
If you deploy your application with PM2, then you can take advantage of clustering without modifying your application code. You should ensure your application is stateless first, meaning no local data is stored in the process (such as sessions, websocket connections and the like).
When running an application with PM2, you can enable cluster mode to run it in a cluster with a number of instances of your choosing, such as the matching the number of available CPUs on the machine. You can manually change the number of processes in the cluster using the pm2 command line tool without stopping the app.
To enable cluster mode, start your application like so:
# Start 4 worker processes
$ pm2 start npm --name my-app -i 4 -- start
# Auto-detect number of available CPUs and start that many worker processes
$ pm2 start npm --name my-app -i max -- start
This can also be configured within a PM2 process file (ecosystem.config.js or similar) by setting exec_mode to cluster and instances to the number of workers to start.
Once running, a given application with the name app can be scaled like so:
# Add 3 more workers
$ pm2 scale my-app +3
# Scale to a specific number of workers
$ pm2 scale my-app 2
For more information on clustering with PM2, see Cluster Mode in the PM2 documentation.
要求の結果をキャッシュに入れる
実稼働環境のパフォーマンスを向上させるもう 1 つの戦略は、アプリケーションが同じ要求に何回も対応するために操作を繰り返すことがないように、要求の結果をキャッシュに入れることです。
Use a caching server like Varnish or Nginx (see also Nginx Caching) to greatly improve the speed and performance of your app.
ロード・バランサーを使用する
アプリケーションがどれだけ最適化されていても、単一インスタンスは、限られた量の負荷とトラフィックしか処理できません。アプリケーションを拡張する 1 つの方法は、複数インスタンスを実行して、ロード・バランサーを使用してトラフィックを分散させることです。ロード・バランサーをセットアップすると、アプリケーションのパフォーマンスと速度を向上させることができ、単一インスタンスよりも大規模に拡張できます。 One way to scale an app is to run multiple instances of it and distribute the traffic via a load balancer. Setting up a load balancer can improve your app’s performance and speed, and enable it to scale more than is possible with a single instance.
A load balancer is usually a reverse proxy that orchestrates traffic to and from multiple application instances and servers. You can easily set up a load balancer for your app by using Nginx or HAProxy.
With load balancing, you might have to ensure that requests that are associated with a particular session ID connect to the process that originated them. This is known as session affinity, or sticky sessions, and may be addressed by the suggestion above to use a data store such as Redis for session data (depending on your application). For a discussion, see Using multiple nodes.
リバース・プロキシーを使用する
A reverse proxy sits in front of a web app and performs supporting operations on the requests, apart from directing requests to the app. It can handle error pages, compression, caching, serving files, and load balancing among other things.
アプリケーションの状態を知る必要のないタスクをリバース・プロキシーに引き渡すことで、Express が解放されて、特殊なアプリケーション・タスクを実行できるようになります。この理由から、実稼働環境で Express を Nginx や HAProxy などのリバース・プロキシーの背後で実行することをお勧めします。 For this reason, it is recommended to run Express behind a reverse proxy like Nginx or HAProxy in production.
Edit this page