正式作業最佳作法:效能和可靠性
本文討論部署至正式作業之 Express 應用程式的效能與可靠性最佳作法。
This topic clearly falls into the “devops” world, spanning both traditional development and operations. Accordingly, the information is divided into two parts:
- Things to do in your code (the dev part):
- Things to do in your environment / setup (the ops part):
- 將 NODE_ENV 設為 “production”
- 確定您的應用程式自動重新啟動
- Run your app in a cluster
- Cache request results
- 負載平衡器通常是一個反向 Proxy,負責協調與多個應用程式實例和伺服器之間的資料流量。利用 Nginx 或 HAProxy,就能輕鬆設定您應用程式的負載平衡器。
- 反向 Proxy 位於 Web 應用程式前面,除了將要求引導至應用程式,也會對要求執行支援的作業。除此之外,它還可以處理錯誤頁面、壓縮、快取、提供的檔案,以及負載平衡。
Things to do in your code
以下是您可以在程式碼中執行的一些作法,藉以改良您應用程式的效能:
採用 gzip 壓縮
Gzip compressing can greatly decrease the size of the response body and hence increase the speed of a web app. Use the compression middleware for gzip compression in your Express app. For example:
const compression = require('compression')
const express = require('express')
const app = express()

app.use(compression())
For a high-traffic website in production, the best way to put compression in place is to implement it at a reverse proxy level (see Use a reverse proxy). In that case, you do not need to use compression middleware. 在正式作業中,如果網站的資料流量極高,落實執行壓縮最好的作法是在反向 Proxy 層次實作它(請參閱使用反向 Proxy)。在該情況下,就不需使用壓縮中介軟體。如需在 Nginx 中啟用 gzip 壓縮的詳細資料,請參閱 Nginx 說明文件中的 ngx_http_gzip_module 模組。
不使用同步函數
Synchronous functions and methods tie up the executing process until they return. A single call to a synchronous function might return in a few microseconds or milliseconds, however in high-traffic websites, these calls add up and reduce the performance of the app. Avoid their use in production.
雖然 Node 和許多模組會提供其函數的同步與非同步版本,在正式作業中,請一律使用非同步版本。唯一有理由使用同步函數的時機是在最初啟動之時。 The only time when a synchronous function can be justified is upon initial startup.
You can use the --trace-sync-io command-line flag to print a warning and a stack trace whenever your application uses a synchronous API. Of course, you wouldn’t want to use this in production, but rather to ensure that your code is ready for production. See the node command-line options documentation for more information.
Do logging correctly
In general, there are two reasons for logging from your app: For debugging and for logging app activity (essentially, everything else). Using console.log() or console.error() to print log messages to the terminal is common practice in development. But these functions are synchronous when the destination is a terminal or a file, so they are not suitable for production, unless you pipe the output to another program.
For debugging
如果您為了除錯而記載,則不要使用 console.log(),請改用 debug 之類的特殊除錯模組。這個模組可讓您使用 DEBUG 環境變數,來控制哪些除錯訊息(若有的話)要送往 console.err()。為了讓應用程式完全維持非同步,您仍得將 console.err() 引導至另一個程式。但之後在正式作業中,實際上您並不會進行除錯,不是嗎? This module enables you to use the DEBUG environment variable to control what debug messages are sent to console.error(), if any. To keep your app purely asynchronous, you’d still want to pipe console.error() to another program. But then, you’re not really going to debug in production, are you?
為了應用程式活動
If you’re logging app activity (for example, tracking traffic or API calls), instead of using console.log(), use a logging library like Pino, which is the fastest and most efficient option available.
Handle exceptions properly
Node apps crash when they encounter an uncaught exception. Not handling exceptions and taking appropriate actions will make your Express app crash and go offline. If you follow the advice in Ensure your app automatically restarts below, then your app will recover from a crash. Fortunately, Express apps typically have a short startup time. Nevertheless, you want to avoid crashing in the first place, and to do that, you need to handle exceptions properly.
為了確保您能處理所有的異常狀況,請使用下列技術:
Before diving into these topics, you should have a basic understanding of Node/Express error handling: using error-first callbacks, and propagating errors in middleware. Node uses an “error-first callback” convention for returning errors from asynchronous functions, where the first parameter to the callback function is the error object, followed by result data in succeeding parameters. To indicate no error, pass null as the first parameter. The callback function must correspondingly follow the error-first callback convention to meaningfully handle the error. And in Express, the best practice is to use the next() function to propagate errors through the middleware chain.
如需進一步瞭解錯誤處理的基本概念,請參閱:
使用 try-catch
try-catch 是一種 JavaScript 語言建構,可用來捕捉同步程式碼中的異常狀況。例如,如以下所示,利用 try-catch 來處理 JSON 剖析錯誤。 Use try-catch, for example, to handle JSON parsing errors as shown below.
Here is an example of using try-catch to handle a potential process-crashing exception. This middleware function accepts a query field parameter named “params” that is a JSON object.
app.get('/search', (req, res) => {
  // Simulating async operation
  setImmediate(() => {
    const jsonStr = req.query.params
    try {
      const jsonObj = JSON.parse(jsonStr)
      res.send('Success')
    } catch (e) {
      res.status(400).send('Invalid JSON string')
    }
  })
})
However, try-catch works only for synchronous code. 不過,try-catch 只適用於同步程式碼。由於 Node 平台主要是非同步(尤其是在正式作業環境),try-catch 不會捕捉大量的異常狀況。
使用 promise
When an error is thrown in an async function or a rejected promise is awaited inside an async function, those errors will be passed to the error handler as if calling next(err)
app.get('/', async (req, res, next) => {
  const data = await userData() // If this promise fails, it will automatically call `next(err)` to handle the error.

  res.send(data)
})

app.use((err, req, res, next) => {
  res.status(err.status ?? 500).send({ error: err.message })
})
Also, you can use asynchronous functions for your middleware, and the router will handle errors if the promise fails, for example:
app.use(async (req, res, next) => {
  req.locals.user = await getUser(req)

  next() // This will be called if the promise does not throw an error.
})
Best practice is to handle errors as close to the site as possible. So while this is now handled in the router, it’s best to catch the error in the middleware and handle it without relying on separate error-handling middleware.
What not to do
One thing you should not do is to listen for the uncaughtException event, emitted when an exception bubbles all the way back to the event loop. Adding an event listener for uncaughtException will change the default behavior of the process that is encountering an exception; the process will continue to run despite the exception. This might sound like a good way of preventing your app from crashing, but continuing to run the app after an uncaught exception is a dangerous practice and is not recommended, because the state of the process becomes unreliable and unpredictable.
此外,使用 uncaughtException 被公認為拙劣作法,這裡有一份提案,指出如何將它從核心移除。因此,接聽 uncaughtException 並不可取。這是我們建議採取多重程序和監督程式等事項的原因:當機再重新啟動,通常是從錯誤回復最可靠的作法。 So listening for uncaughtException is just a bad idea. This is why we recommend things like multiple processes and supervisors: crashing and restarting is often the most reliable way to recover from an error.
我們也不建議使用 domains。它通常不能解決問題,並且是個已淘汰的模組。 It generally doesn’t solve the problem and is a deprecated module.
Things to do in your environment / setup
{#in-environment}
以下是您可以在系統環境中執行的一些作法,藉以改良您應用程式的效能:
- 將 NODE_ENV 設為 “production”
- 確定您的應用程式自動重新啟動
- Run your app in a cluster
- Cache request results
- 負載平衡器通常是一個反向 Proxy,負責協調與多個應用程式實例和伺服器之間的資料流量。利用 Nginx 或 HAProxy,就能輕鬆設定您應用程式的負載平衡器。
- 反向 Proxy 位於 Web 應用程式前面,除了將要求引導至應用程式,也會對要求執行支援的作業。除此之外,它還可以處理錯誤頁面、壓縮、快取、提供的檔案,以及負載平衡。
將 NODE_ENV 設為 “production”
The NODE_ENV environment variable specifies the environment in which an application is running (usually, development or production). One of the simplest things you can do to improve performance is to set NODE_ENV to production.
將 NODE_ENV 設為 “production”,可讓 Express:
- Cache view templates.
- 快取從 CSS 延伸項目產生的 CSS 檔案。
- Generate less verbose error messages.
Tests indicate that just doing this can improve app performance by a factor of three!
如果您需要撰寫環境特定的程式碼,您可以使用 process.env.NODE_ENV 來檢查 NODE_ENV 的值。請注意,檢查任何環境變數的值都會影響效能,因此請慎行。 Be aware that checking the value of any environment variable incurs a performance penalty, and so should be done sparingly.
In development, you typically set environment variables in your interactive shell, for example by using export or your .bash_profile file. But in general, you shouldn’t do that on a production server; instead, use your OS’s init system (systemd). The next section provides more details about using your init system in general, but setting NODE_ENV is so important for performance (and easy to do), that it’s highlighted here.
採用 systemd 時,請在單位檔案中使用 Environment 指引。例如: For example:
# /etc/systemd/system/myservice.service
Environment=NODE_ENV=production
For more information, see Using Environment Variables In systemd Units.
確定您的應用程式自動重新啟動
In production, you don’t want your application to be offline, ever. This means you need to make sure it restarts both if the app crashes and if the server itself crashes. Although you hope that neither of those events occurs, realistically you must account for both eventualities by:
- 當應用程式(和 Node)當機時,使用程序管理程式重新啟動它。
- Using the init system provided by your OS to restart the process manager when the OS crashes. It’s also possible to use the init system without a process manager.
Node applications crash if they encounter an uncaught exception. The foremost thing you need to do is to ensure your app is well-tested and handles all exceptions (see handle exceptions properly for details). But as a fail-safe, put a mechanism in place to ensure that if and when your app crashes, it will automatically restart.
使用程序管理程式
在開發中,只需從指令行使用 node server.js 或類似指令,就會啟動應用程式。但在正式作業中這樣做,卻會成為禍因。如果應用程式當機,就會離線直到您重新啟動它為止。為了確保應用程式會在當機時重新啟動,請使用程序管理程式。程序管理程式是一個應用程式的「儲存器」,有助於部署、提供高可用性,並可讓您在執行時期管理應用程式。 But doing this in production is a recipe for disaster. If the app crashes, it will be offline until you restart it. To ensure your app restarts if it crashes, use a process manager. A process manager is a “container” for applications that facilitates deployment, provides high availability, and enables you to manage the application at runtime.
除了在應用程式當機時重新啟動它,程序管理程式還可讓您:
- 洞察執行時期效能和資源的耗用情況。
- 動態修改設定,以改良效能。
- Control clustering (pm2).
Historically, it was popular to use a Node.js process manager like PM2. See their documentation if you wish to do this. However, we recommend using your init system for process management.
使用 init 系統
The next layer of reliability is to ensure that your app restarts when the server restarts. Systems can still go down for a variety of reasons. To ensure that your app restarts if the server crashes, use the init system built into your OS. The main init system in use today is systemd.
init 系統若要與 Express 應用程式搭配使用,其作法有二:
- Run your app in a process manager, and install the process manager as a service with the init system. The process manager will restart your app when the app crashes, and the init system will restart the process manager when the OS restarts. This is the recommended approach.
- Run your app (and Node) directly with the init system. This is somewhat simpler, but you don’t get the additional advantages of using a process manager.
Systemd
Systemd 是一個 Linux 系統和服務管理程式。大部分主要的 Linux 發行套件已採用 systemd 作為其預設 init 系統。 Most major Linux distributions have adopted systemd as their default init system.
A systemd service configuration file is called a unit file, with a filename ending in .service. Here’s an example unit file to manage a Node app directly. Replace the values enclosed in <angle brackets> for your system and app:
[Unit]
Description=<Awesome Express App>

[Service]
Type=simple
ExecStart=/usr/local/bin/node </projects/myapp/index.js>
WorkingDirectory=</projects/myapp>

User=nobody
Group=nogroup

# Environment variables:
Environment=NODE_ENV=production

# Allow many incoming connections
LimitNOFILE=infinity

# Allow core dumps for debugging
LimitCORE=infinity

StandardInput=null
StandardOutput=syslog
StandardError=syslog
Restart=always

[Install]
WantedBy=multi-user.target
如需 systemd 的相關資訊,請參閱 systemd 參照(線上指令說明)。
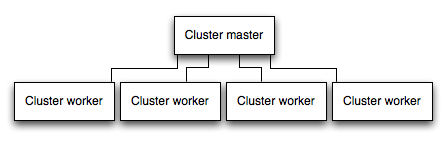
Run your app in a cluster
In a multi-core system, you can increase the performance of a Node app by many times by launching a cluster of processes. A cluster runs multiple instances of the app, ideally one instance on each CPU core, thereby distributing the load and tasks among the instances.
IMPORTANT: Since the app instances run as separate processes, they do not share the same memory space. That is, objects are local to each instance of the app. Therefore, you cannot maintain state in the application code. However, you can use an in-memory datastore like Redis to store session-related data and state. This caveat applies to essentially all forms of horizontal scaling, whether clustering with multiple processes or multiple physical servers.
In clustered apps, worker processes can crash individually without affecting the rest of the processes. Apart from performance advantages, failure isolation is another reason to run a cluster of app processes. Whenever a worker process crashes, always make sure to log the event and spawn a new process using cluster.fork().
使用 Node 的叢集模組
Clustering is made possible with Node’s cluster module. This enables a master process to spawn worker processes and distribute incoming connections among the workers.
Using PM2
If you deploy your application with PM2, then you can take advantage of clustering without modifying your application code. You should ensure your application is stateless first, meaning no local data is stored in the process (such as sessions, websocket connections and the like).
When running an application with PM2, you can enable cluster mode to run it in a cluster with a number of instances of your choosing, such as the matching the number of available CPUs on the machine. You can manually change the number of processes in the cluster using the pm2 command line tool without stopping the app.
To enable cluster mode, start your application like so:
# Start 4 worker processes
$ pm2 start npm --name my-app -i 4 -- start
# Auto-detect number of available CPUs and start that many worker processes
$ pm2 start npm --name my-app -i max -- start
This can also be configured within a PM2 process file (ecosystem.config.js or similar) by setting exec_mode to cluster and instances to the number of workers to start.
Once running, the application can be scaled like so:
# Add 3 more workers
$ pm2 scale my-app +3
# Scale to a specific number of workers
$ pm2 scale my-app 2
For more information on clustering with PM2, see Cluster Mode in the PM2 documentation.
快取要求結果
在正式作業中改良效能的另一項策略是快取要求的結果,這樣您的應用程式就不會重複執行作業而反覆處理相同的要求。
Use a caching server like Varnish or Nginx (see also Nginx Caching) to greatly improve the speed and performance of your app.
使用負載平衡器
No matter how optimized an app is, a single instance can handle only a limited amount of load and traffic. One way to scale an app is to run multiple instances of it and distribute the traffic via a load balancer. Setting up a load balancer can improve your app’s performance and speed, and enable it to scale more than is possible with a single instance.
A load balancer is usually a reverse proxy that orchestrates traffic to and from multiple application instances and servers. You can easily set up a load balancer for your app by using Nginx or HAProxy.
With load balancing, you might have to ensure that requests that are associated with a particular session ID connect to the process that originated them. This is known as session affinity, or sticky sessions, and may be addressed by the suggestion above to use a data store such as Redis for session data (depending on your application). For a discussion, see Using multiple nodes.
使用反向 Proxy
A reverse proxy sits in front of a web app and performs supporting operations on the requests, apart from directing requests to the app. It can handle error pages, compression, caching, serving files, and load balancing among other things.
Handing over tasks that do not require knowledge of application state to a reverse proxy frees up Express to perform specialized application tasks. For this reason, it is recommended to run Express behind a reverse proxy like Nginx or HAProxy in production.
Edit this page